Until Zwift set up their own voice chat facility, I've tried to encourage riders to use Discord. It's free and relatively easy to set up; however, some have had difficulties with their microphone and/or audio, so I've put together this step-by-step guide for using Discord on the iPhone (it may differ on Android) but it should also be similar for your PC.
Step 1 - download the free App to your phone
Step 2 - join the ZHR server on Discord: discord.gg/bVURRmG and enter your details and nickname
Step 3 - you should see this welcome screen, which automatically shows you if any of your friends are online. Various options are available but, for our purposes, click on the top left icon, with the three horizontal bars.
Step 4 - you will be taken to the list of chat servers that you have joined. In my case, I've joined the ODZ server as well as ZHR. You should see ZHR's server if you used the invite link in step 2. Click on the ZHR icon to take you to our server.
Step 5 - you will see Text Channels and Voice Channels. Text Channels allow you to send typed messages just as if you were in Zwift, FB or mobile. The Voice Channels are divided into different chat rooms; the General channel is your main "room", with Groups A-F used for Hare & Hounds or events where there are separate groups. Also useful to head in there if you want to chat with just a few riders, not the whole group. Click on one of the Voice Channels.
Step 6 - you will be asked if you want to connect to this Voice Channel. Click on "Connect to Voice"
 Step 7 - you are now connected to the Voice Channel, in this case the General Channel. You can also send text messages from here. If you don't see the "Push to Talk" button, don't worry, I'll come to that. On the bottom row you have "Disconnect" to take you out of the Voice Channel, "Voice Settings" that I will explain next, the microphone icon that allows you to mute, the headphones icon that allows you to stop audio, and the speaker icon on the bottom right that I will explain later. Click on "Voice Settings".
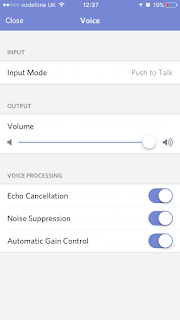
  Step 8 - if it's not already set as default, please change Input Mode to "Push to Talk" so that we only hear you when you want us to; otherwise, we hear everything...all the time! Output Volume is up to you, I need to set it on max to overcome the noise of the trainer and music. Switch on all the Voice Processing options, they help with clarity and stability. Click on "Close" to go back to the Voice Channel (step 7) and click on the speaker icon in the bottom right corner.
 Step 9 - select from where you would like to hear the audio. I prefer iPhone, which means headphones, but you can set it so that it comes through the iPhone's speaker. If you have headphones with a microphone built-in, I suggest clicking on the iPhone option. If not, you'll have to use the phone's microphone (just like making a call), so you may as well use the speaker. NB - I've found the headphones to be much clearer than the speaker and with better volume; try it out, see which you prefer.


No comments:
Post a Comment